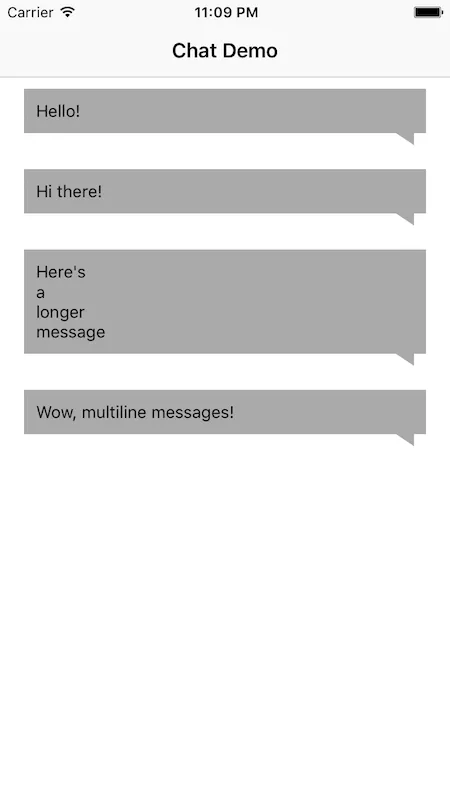
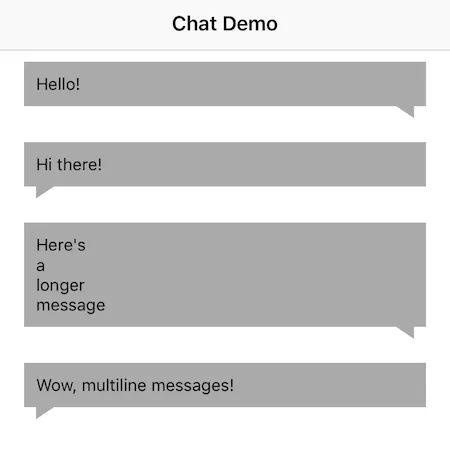
A common theme in messaging apps is to have a message bubble with a tail — it’s better than just a bunch of blocks stacked on top of each other and it’s an easy way to distinguish who sent a particular message. Though at this point in your iOS development experience you may wonder how exactly these custom views are created, so in this post I’ll show you how to make your own!
Note: For this tutorial I have already prepared a project available on Github which has dynamically sized UITableViewCell’s setup. This is written in Swift 3 using Xcode 8.3.3.
Bezier Paths to the Rescue
Creating a square message cell isn’t difficult, even one with rounded corners isn’t too bad, but you’ll have to change up the way you normally create cells in order to add a tail at the bottom of your messages. Below I’ll take you through the steps to not only draw a tail below your message cells, but also having it draw to the left or right based on who is sending the message, similar to iMessage.
In order to achieve our final result we’ll need to draw the shape of the message bubble using a [UIBezierPath](https://developer.apple.com/documentation/uikit/uibezierpath) and then fill it in with our desired color. It may seem daunting at first, but think of it just like drawing a square on a piece of paper. You start at a given point, think (0,0), and begin drawing your first line to the next point, (1,0). Three more sides later and you’re back at your starting point, ready to close off your shape and fill it in. Now we just have to do the same thing in code!
Drawing the Message Body
Hop into the classMessageBubbleView and let’s begin writing our code in draw(_ rect). (Remove the call the super.drawRect as we will be providing our own drawing code.) Now we can begin our path with the following code:
let bezierPath = UIBezierPath()
bezierPath.move(to: CGPoint(x: rect.minX, y: rect.minY))
Think of move as code for picking up your pencil and placing it at a given point. This will be the starting point of our message bubble. Now we’re going to draw the top line.
bezierPath.addLine(to: CGPoint(x: rect.maxX, y: rect.minY))
This will draw a line to the far right edge of the rect, which is the maxX. Now we can follow the same logic to draw the other three edges.
bezierPath.addLine(to: CGPoint(x: rect.maxX, y: rect.maxY - 10.0))
bezierPath.addLine(to: CGPoint(x: rect.minX, y: rect.maxY - 10.0))
bezierPath.addLine(to: CGPoint(x: rect.minX, y: rect.minY))
Now you might wonder why I’m not drawing my line all the way down to the bottom edge of the rect, or maxY. This is because I’m leaving a 10.0 point space for drawing our tail. I encourage to adjust these values and see what the different outcomes are in your own code!
Drawing the Tail
Now to add the tail. We’ll make use of the move function again here. Just as you would pick up your pencil from the top left edge of the rect (where we just ended our last line) and move it to the starting point for the tail. In this example I’m going to draw a tail that points down and to the right, and then draw a flat edge that comes back up and meets our message body.
bezierPath.move(to: CGPoint(x: rect.maxX - 25.0, y: rect.maxY - 10.0))
bezierPath.addLine(to: CGPoint(x: rect.maxX - 10.0, y: rect.maxY))
bezierPath.addLine(to: CGPoint(x: rect.maxX - 10.0, y: rect.maxY - 10.0))
We have our shape! But if you run the code you will notice that you can’t see it. This is because we need to close our path and fill it in.
UIColor.lightGray.setFill()
bezierPath.fill()
bezierPath.close()
Great! We close out our path and fill it with a light gray color. Now our draw method should look like this:
override func draw(_ rect: CGRect) {
let bezierPath = UIBezierPath()//Draw main body
bezierPath.move(to: CGPoint(x: rect.minX, y: rect.minY))
bezierPath.addLine(to: CGPoint(x: rect.maxX, y: rect.minY))
bezierPath.addLine(to: CGPoint(x: rect.maxX, y: rect.maxY - 10.0))
bezierPath.addLine(to: CGPoint(x: rect.minX, y: rect.maxY - 10.0))
bezierPath.addLine(to: CGPoint(x: rect.minX, y: rect.minY))//Draw the tail
bezierPath.move(to: CGPoint(x: rect.maxX - 25.0, y: rect.maxY - 10.0))
bezierPath.addLine(to: CGPoint(x: rect.maxX - 10.0, y: rect.maxY))
bezierPath.addLine(to: CGPoint(x: rect.maxX - 10.0, y: rect.maxY - 10.0))UIColor.lightGray.setFill()
bezierPath.fill()
bezierPath.close()
}
Build and run the project and you should have the following result:

Shifting the Tail
This is looking good! Now it would be nice if the tail shifted based on who sent the message. To do this we’re going to setup a variable on our MessageBubbleView that acts as a flag to determine where to position the tail.
var currentUserIsSender = true {
    didSet {
        setNeedsDisplay()
    }
}
Now we have a public property called currentUserIsSender which defaults to true. Using Swift’s didSet allows us to notify the view that it needs to redraw itself after this property has changed by calling setNeedsDisplay. Now in our draw method we can adjust the tail based on this value.
if currentUserIsSender {
    bezierPath.move(to: CGPoint(x: rect.maxX - 25.0, y: rect.maxY - 10.0))
    bezierPath.addLine(to: CGPoint(x: rect.maxX - 10.0, y: rect.maxY))
    bezierPath.addLine(to: CGPoint(x: rect.maxX - 10.0, y: rect.maxY - 10.0))
} else {
    //Draw the tail on the left
}
Here I just moved the current tail drawing code into an if/else statement based on our flag we setup. Now we just have to add the code to draw the tail on the left hand side. All that needs to be done is, instead of starting at the maxX we start at minX like so:
bezierPath.move(to: CGPoint(x: rect.minX + 25.0, y: rect.maxY - 10.0))
bezierPath.addLine(to: CGPoint(x: rect.minX + 10.0, y: rect.maxY))
bezierPath.addLine(to: CGPoint(x: rect.minX + 10.0, y: rect.maxY - 10.0))
Now let’s add a way to update the currentUserIsSender flag. Add a new property to the configure method in MessageTableViewCell:
func configure(withMessage message: String, currentUserIsSender: Bool) {
    messageLabel.text = message
    messageContainerView.currentUserIsSender = currentUserIsSender
}
Then we can add some logic to switch that flag every other message in our cellForRow method:
let currentUserIsSender = indexPath.row % 2 == 0
cell.configure(withMessage: message, currentUserIsSender: currentUserIsSender)
Alright, now we have a tail that will alternative based who sent the message! Go ahead and build and run the project to see the results.

Awesome! 🎉
Now you’re up an running with UIBezierPath’s! There’s so much more you can do now and I encourage you to experiement even further with the project! It may even be easier to draw your idea out on paper and then translate that into code.
Some ideas that you can play around with are:
- Alternate the color of the message based on who sent it
- Adjust the shape and position of the tail
- Adjust the text alignment based on who sent the message
In the future I plan to extend this project with further examples. Until then, play around with the current project, and you can also find the finished project by checking out the finished-project branch from my Github repo.